Savory-spicy Squash Pancakes

Some context: for much of the winter, there is a seemingly bottomless bowl of leftover winter squash in our fridge, a result of our habit of baking as many as the oven can hold, anytime we bake, well, just about anything. Over the years we have made many unsuccessful attempts at squash fritters….mixing the squash puree with eggs, with various flours (being limited to gluten free options doesn’t help with binding things together).

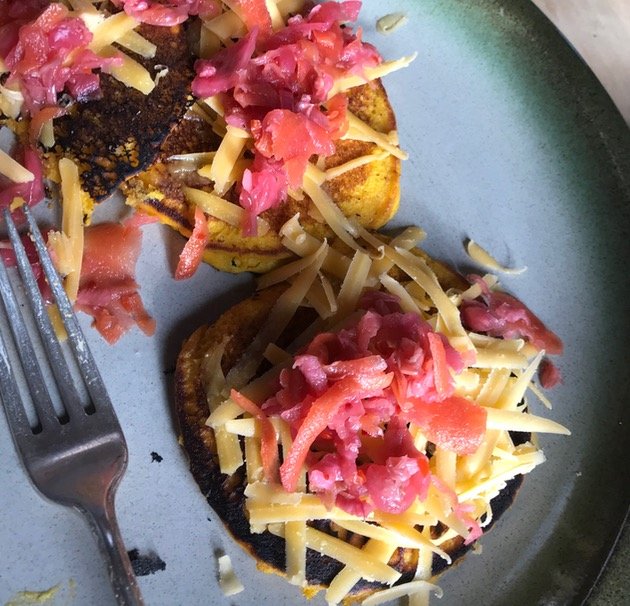
But this week, we found success by simply blending the baked squash in about a 1:2 ratio into the regular pancake batter that works for us, and adding a little extra egg. You could almost certainly use this method for a sweet version, going all cinnamon and ginger, or pumpkin pie spices. But we happened to be inspired by some really good garlic, and our quart-jar of mixed Thai basil and Thai chili flakes. The result was a spicy, savory, squash pancake you could top with or wrap around just about anything….we went with cheese and kimchi. Maple syrup optional, but if you are a sweet + tangy + spicy fan, we recommend it.

How to do it:

Ingredients:

1 cup of a pancake mix that needs egg and oil added (or about 2 cups of your favorite pancake batter, however you make it)

1 cup of baked winter squash, any variety

2 eggs (or double the quantity called for in your mix or pancake recipe)

2 tablespoons toasted sesame oil (or you preferred cooking oil, but toasted sesame added some extra savory flavor to this combo)

1 huge or several small garlic cloves, finely minced

1-2 teaspoons of red chili flakes or chili-basil mix; (if you don’t have either of these, I would try 1/4 tsp of cayenne powder, and adjust based on taste. or have extra hot sauce on hand for topping).

2/3 cup of water (or roughly 2/3 - 3/4 of the liquid called for in your pancake recipe)

How to:

Combine all the ingredients in a large bowl, and mix til smooth with an immersion blender. Adjust liquid amount as needed to make a batter typical of your usual pancake batter. Pour onto a hot oiled griddle in 4-6” circles, and flip once, when bubbles have reached the center of each circle. Top with savory bits of your choice!

Squash and Grain Bowl

This one is a simple, healthy, meal that it worth making as a big batch for deliberate lunch-tomorrow leftovers. Any version of “grain bowl” that we make deserves a shout-out to Bouilla Restaurant, one of the two local places we deliver produce to, and make sure to eat at on a regular basis. Our homemade versions never reach the special saucy savory magic that their warm grain bowls manage (you should really go try them), but they provide inspiration and something to work towards in our own kitchen.

For this dish, enough to feed at least 4 people, or 2 people a couple of times, you’ll need:

-2 cups dry quinoa or equivalent of your favorite grain or grain/ legume combo

-4 cups of broth (or water), or enough to cook your chosen grains in

-about 4 cups of peeled and cubed squash (butternut, buttercup, or red Kuri are some of the easiest to prepare this way). We like small cubes for this, maybe half-inch, so they cook pretty fast.

-generous slosh of your favorite cooking oil, for sautéing

-1 medium sweet onion or yellow onion, diced

-2-3 cloves of garlic, minced

-about 1 cup of fresh spinach per person/ serving (two of us used a 5—oz bag), torn or chopped into your preferred bite-size pieces.

-flavorings and saucy components of your choice. We used 12 oz lite coconut milk and a tablespoon or two of curry powder; you could also go with ~1.5-2 cups of frozen or canned chopped tomatoes, seasoned with cumin, salt, pepper, and chili powder or red pepper flakes, or…..? Experiment with your favorites!

Directions:

First, cook quinoa or your choice of grains in the broth. We like quinoa both for the protein and because if you start it first, it will probably cook by the time you gather and prep the other ingredients, being a pretty quick-cooking grain. Just mix twice the amount of liquid with the quinoa, bring to a boil with the lid off, then cover, turn down the heat and simmer for 15-20 minutes, until all liquid is absorbed and the grains are soft and fluffy.

While that is cooking, chop your onions, squash, garlic, and find/ choose your spices.

Sautee the onions and garlic over medium-high heat for 2-3 minutes first, then add the squash to the pan. Stir everyone around for another few minutes, add the spices, then add a few spoonfuls of water or broth, and cover with a tight-fitting lid for several minutes. (This will help steam and soften the squash quickly—you can also just keep stirring and sautéing and just take a little longer). Remove the lid and stir periodically, to prevent sticking to the pan (bear in mind we cook entirely in cast iron).

When squash is almost s soft as you’d like in the finished dish, add the saucy components (coconut milk in our version), and continue stirring at medium-low heat, just gently bubbling and mixing the flavors. Taste, adjust, improvise, till your squash is soft and the flavors are to your liking.

Once that is ready and the quinoa is cooked, serve it up by making a layer of quinoa in each bowl, followed by a layer of spinach, and topped with a ladle-full of the saucy squash-y, mixture.

Leftovers of this are excellent re-heated, or just packed up for a lunch, without heating.

Mustard Greens Pesto

Every spring we plant a row of beautifully hot and unique mustard greens, and every year we remember that they are not one of the most common vegetables for people in our region. At market we answer questions about what they are and how to use them, and try to convince you to give them a shot. Every year we fail to do them justice by describing our usual uses "put them on a sandwich" (Have you figured out yet that we put everything on sandwiches?) "They are great in a brothy noodle soup, or a stir-fry. If they are too hot for you, cooking tames them down; try them in scrambled eggs." (Have you figured out yet that we put everything in our scrambled eggs? And yes, sometimes we put scrambled eggs in our sandwiches.) 

We were determined this spring to give you something a little different, so today at lunch we tried out a new experiment and deemed it worthy of sharing: mustard greens pesto.  Simple to whip up, this turned a large bundle of mustard greens into a spicy vibrant green sauce that can be used any number of ways.  Of course, we first put it on our sandwiches.  But we also tossed  a few cups of cooked garbanzo beans with a few spoonfuls of the peanut-butter version, and polished those off as a little snack.  Try spreading it on grilled fish or meats, using it as a dip or  of course you could always drizzle it on scrambled eggs. 

Directions

about 2 cups finely chopped hot mustard greens 

about 1/3 cup of sesame oil, olive oil, or a blend 

1 tablespoon rice vinegar or lemon juice 

1 dried hot chili or 1 tsp red pepper flakes (more or less to taste) 

1 clove garlic or a small handfull of chopped chives or onion

2 tablespoons peanut butter (optional) or 1/4 cup toasted walnuts

salt and pepper to taste

-Blend chopped leaves, rice vinegar, and chili flakes in food processor or blender (include nuts in this step, if using).  Slowly add oil till mixture becomes smooth and creamy.  (If adding peanut butter, blend it in after the oil).  We used our immersion blender, which may not be ideal, but it worked.  

-Taste and adjust as needed. More nuts or peanut butter will lessen the heat and make a thicker paste, more chili flakes and mustard greens will up the heat

Screen Shot 2018-05-26 at 12.16.14 AM.jpg

Creamy Roasted Carrot Soup

Screen Shot 2020-11-05 at 10.38.13 AM.jpg


We discovered this soup last fall when we had a LOT of freeze-damaged carrots to use up. Happily, it works just as well with A-grade carrots which are plentiful in the farmstore right now. The original recipe was in Cooking Lite Magazine, Nov. 2018, and we did not alter it much—though we usually end up making it without the cilantro garnish, and often without the avocado (don’t you wish we could grow those here?. It’s a good satisfying fall and winter soup, and with the blended-in beans and the lentil topping, it packs some good long-lasting protein into the soup bowl.

 Farm ingredients: 

  • 1 1/4 pounds carrots roughly chopped, or about 3 cups (one bunch or one farmstore bag should do it, with a few carrots left for snacking)

  • 2 cups chopped onion

  • 1 fresh hot red chili, chopped (or 1 tsp red pepper flakes)

  • 1/2 - 3/4 cup chopped cilantro (1-2 bunches)

Other Ingredients: 

  • 1 Tbsp olive oil

  • 1/2 tsp salt, plus more to taste

  • 2 Tbsp red curry paste

  • 2 tsp peeled and grated fresh ginger

  • 1 can unsalted cannelini beans, drained (or 2 cups cooked at home)

  • 3 cups good broth or stock (chicken broth was delicious, or you can use vegetable stock to keep it vegan)

  • 1 can coconut milk (recipe calls for 'light' coconut milk, but we went with full fat...chose your style, maybe depending on how much farmwork you plan to do that week)

  • 3 Tbsp lime juice

  • 1/2 tsp black pepper

  • 2 ripe avocados

  • 1 cup cooked lentils (optional, but a really nice addition)


Directions: 

  1. Preheat oven to 450. Toss carrots, 1.5 teaspoons of oil, and 1/2 teaspoon salt on a baking sheet. Roast at 450 till the carrots are fork-tender, about 20 minutes, stirring once.

  2. Meanwhile, heat remaining oil in a heavy pot over medium. Add onions and cook, stirring often, till lightly browned, 10-15 minutes.

  3. Add curry paste, grated ginger, and crushed red pepper to pot and cook, stirring constantly, untill fragrant, one minute or so. Add the cooked carrots, beans, stock, and remaining 1/8 teaspoon salt. Reduce heat to medium, and simmer about 5 minutes.

  4. Add coconut milk, and blend with an immersion blender (or in batches in a regular blender) till smooth. Return to heat and heat gently, to not quite boiling.

  5. Stir in lime juice and black pepper. Divide soup into bowls, and top evenly with the cooked lentils, cilantro, and thin slices of avocado.

Roasted Tomato Soup, SweetRoot Style

fullsizeoutput_235.jpeg

Some years ago, while still in our outdoor kitchen, we launched a quest for the best version of tomato soup. We tried multiple recipes with all sorts of variations, but this was the winner. You can make it with any type of our tomatoes (the photo above was heavy on the golden types). With up to 3/4 of an inch of rain forecast for tomorrow, I’m guessing we’ll be ready for a cup of this after market, and maybe you will be too.

Ingredients:

2 1/2 pounds fresh tomatoes 

1 1/2 cups of sweet or yellow onion, sliced

2-4 medium garlic cloves (or many more if you love garlic; we use a whole head)

1/4-1/3 cup olive oil

salt and freshly ground pepper

1 quart chicken stock or good vegetable broth

2-3 tablespoons butter

3/4 cup half-and-half or yogurt (optional, for a creamy version)

optional: 1-2 sweet red or yellow/ orange peppers, chopped

Directions:  


Preheat oven to 450.  

Wash tomatoes, cut out stems and any bad spots, cut into quarters and place on a large baking dish, cake ban, or cast-iron skillet.  Add sliced onion and whole, peeled, garlic cloves, and optional sweet peppers, if using.  Drizzle all of these with a generous dose of olive oil.  Roast for 30-45 minutes, stirring once or twice if needed, until tomato chunks begin to lose their shape and juices start to caramelize.  

Remove the roasted tomatoes, etc.,  from the oven and transfer to a large stock pot.  Add 2-3 cups of the chicken stock or broth (use the lesser amounts if you like a really thick soup, or if you plan to add creamy liquids later), bring to a boil and simmer gently for 5-10 minutes to blend flavors and thicken.  Stir in butter to melt, and blend all ingredients with an immersion blender (or in batches in a regular blender or food processor).  Add salt and freshly  ground pepper to taste.  

Add remaining broth and/or cream to reach your preferred thickness and creaminess, and bring gently up to hot (try to not boil the soup with cream).  Serve  hot; it’s nice with a dollop of sour cream or yogurt on top if you don’t add the cream (or, perhaps, even if you do!)  We love tomato soup with grilled cheese, garlic toast, or just sipped by the cup as a snack during cold winter building.  Enjoy!  

All-Encompassing Farm Veggie Pasta Salad

Farm family dinner, in the yurt: veggie pasta salad, and more salad on the side.

Farm family dinner, in the yurt: veggie pasta salad, and more salad on the side.

We got onto a serious kick of pasta salads with veggies last week, with family visiting. When meal planning, we asked ourselves a few times “is it weird if we do the pasta salad again?” and generally decided no, it was a great idea. That’s partly because every time it was a little bit different, and partly because it just felt like a great way to appreciate the waves of produce that were rolling in from the field in abundance. If you are a farm member, this is one of those use-it-all up meals to make the night before you fill your feed bag. It’s also a great way to pre-prep meals for your whole week; if you come home from market with an overflowing basket and worry that your market-morning enthusiasm will diminish during your busy week, try putting on some good music or audio book and spending a little time chopping and prepping for pasta salads during the week. You can store ingredients separately in airtight bowls or containers, or try mixing everything together but changing up your dressings for different meals throughout the week.

The basic directions:

1. Cook one of your favorite short-noodle type pastas according to package instructions, and run cold water over the pasta after straining, to cool it down. We've used penne, shells, and rotini spirals with good results. *Tip—we really this method of lightly cooking some of the vegetables, to avoid creating any additional dishes: when pasta is almost ready, toss chopped veggies into the boiling pasta pot for just the last 60-90 seconds, then drain and cool right along with the noodles, and you’re ready to start mixing in the other ingredients. We do this with big bunched greens, zucchini, garlic scapes, and sometimes carrots.

2. Chop any and every vegetable you have on hand that could conceivably be eaten in pasta salad. Stretch your imagination on what could be combined, and go beyond traditional pasta salad recipes. I haven’t get met anything I wouldn’t include—just chop it into whatever will make pleasant and logical bites, and either cook it first, or don’t. NOTE: we usually end up with about a 3:1 ratio of veggies to pasta. That’s key to making it a healthier meal option, and to using up your pile of produce!

3. Chop or prepare a protein option: chilled cooked beans (garbanzo and kidney beans hold up especially well in the tossing), hard boiled eggs, or a diced meat.

4. Combine all ingredients, and toss with a favorite salad dressing. Try a range of creamy ones, pungent vinegar-based dressings, and do some experimenting with combinations (honey mustard + creamy ranch was a surprising hit in one round). If everyone likes the same things, you can of course toss everything together in a big bowl, and be ready to serve. If picky eaters or different food preferences or even just different moods are a factor, try it buffet style, with each prepared ingredient laid out in separate bowl, and let everyone assemble their own and toss with a dressing of their choice.

One quick dressing suggestion whose creaminess and fresh herbs seemed especially suited to these salads: Blend together in an immersion blender or regular blender:

  • 3-4 chopped garlic scapes

  • 1-2 chopped scallions, including green parts

  • 1 tablespoon chopped fresh parsley

  • 1/2 cup mayonnaise*

  • 1/2 cup plain yogurt*

*you can change these ratios to suit your tastes/ health needs, shifting the balance to more yogurt and less mayo to lower the fat content. 1-2 tablespoons of rice vinegar or lemon juice salt and pepper to taste

Some of our recent combinations: Shell pasta with: broccoli, summer squash cubes, chopped garlic scapes and chopped kale blanched with the boiling pasta for the final minute of cooking, then mixed with scallions, salad turnips, crumbles blue cheese, and diced salami. Tossed with a simple creamy dressing of 1/4 cup mayonaise, 1 tablespoon rice vinegar, and 1 teaspoon of sugar, 1/2 teaspoon of black pepper. Optional: serve on additional salad greens, with a squeeze of fresh lemon juice, salt to taste. Penne, cooked with one or two (we lost track) whole bunches of rainbow chard tossed in at the end. Mixed when cool, with cooked garbanzo beans, olives, snow peas, sautéed garlic scapes and zucchini, cucumber, and several chopped heads of romaine lettuce. Served in butter-lettuce cups, for extra fun. Everyone chose their own dressing, but options included our creamy parsley/ garlic scape/ scallion dressing, a blue cheese, honey mustard, or a balsamic/blueberry vinaigrette. Full disclosure: most of us had several rounds, in order to try all the dressing options.

Lower Salmon River Squash Pie

January can be a tricky time of year for sharing “farm-fresh” recipes. We are digging deep into the freezer for our own dinners, which highlights the somewhat random assortment of food we put up during the busy growing season: frozen zucchini chunks have been delicious in vegetable curries, basil pestos have saved us on more than one busy night, but how did we not make enough tomato soup to even get through January?

Since we can’t be sure what is left in your freezer or pantry, we scratched our heads for for a recipe that would highlight items in the mid-winter farmstore. Of course it was right under our noses: a pile of farm-grade eggs and a potentially overzealous stash of winter squash were taking up a fair amount of space in the yurt kitchen. Know what uses both winter squash and eggs? Pie! Or, as we almost always make it, crust-less pie, which we call pumpkin custard. (We’re not sticklers for terminology on this, as we also make it with winter squash). We skip the crust for a host of reasons….the filling is the healthier part of a squash pie, so now we can totally justify eating it for breakfast; one of us had to stop eating gluten a few years ago, and we haven’t gone through the effort of experimenting with gluten-free pie crust options; and finally, it’s so much faster and easier, we are more likely to make it this way!

Of course, if you see the crust as the best part of a pie, by all means pour this filling into your favorite pie crust recipe.

For one 9-inch pan of pie or custard:

  • 2 cups cooked Salmon River squash, or any winter squash you have on hand.*

  • 2 eggs

  • 1 cup of milk or 1/2 & 1/2 (or coconut milk for the dairy-free / coconut lovers)

2 tablespoons of maple syrup or honey, or 1/3 cup sugar. Note: Adjust sweetener to your taste; a lot depends on the sweetness of the squash you start with, and your preferences. This recipe reflects the sweeter end of our range, which is not exactly normal. Feel free to use double (or more) the sweetener if you have more standard American taste buds.**

2 tsp pumpkin pie spice blend, or 1 tsp cinnamon, and 1/4 tsp each of ground ginger, ground nutmeg, and a small dash of ground clove (adjust to your taste). Substituting 1-2 teaspoons of fresh grated ginger is lovely, too. Experiment to find your best combination.

Directions:

Preheat the oven to 375. Place all ingredients in a medium-sized bowl or large glass measuring cup. Mix until smooth with an immersion blender, wire whisk, or manual egg-beater. NOTE: If you need to do a lot of tasting and adjusting, it would be good food safety practice to mix the eggs in last, after settling on your sugar level.

Pour mixture into an un-greased pie pan and bake approximately 45 minutes, or until a knife inserted in the center comes out clean. For best taste and texture we try to let it cool to room temperature, or chill before serving.

If you like how it turns out, we highly recommend doubling the recipe next time and have one pan left over for breakfast.

*To cook your squash: The Lower Salmon River Squash, like Hubbard squash, have a thick skin. This makes them excellent storage varieties, often lasting well into the next summer. It does make them a little more work to get into, but it’s worth it. Tips for opening hard-shelled squash: resist the urge to use a big thick butcher knife just because this is a big job. I prefer to use my smallest paring knives for opening squash, because the thin blade slips in easier, not needing to create as large of a space. Work your way around it slowly with the small knife, or use the small one to get started, then get the big knife in. Alternately, drop the squash on the floor a few times to get a good crack started, then work out from there. When you have it open, scoop the seeds out (feed them to chickens if you have them!) and bake, face-down in a pan with a little bit of water, at 350-375 for 30-45 minutes, or until the flesh pierces easily with a fork.

**We like to eat this dish as breakfast food with yogurt, as well as for dessert, and quite often we don’t add any sweetener at all to squash custards unless we are taking them to share with others. But don’t assume we’re completely virtuous….it just makes the sugar rush we get when farm members bring us more standardly sweetened treats all the more exciting.

Vegetable Fajitas — SweetRoot Seasonal Sizzle

Ingredients: one medium onion, 1-2 cloves of garlic, a few summer squash (or a lot), 2-3 sweet peppers, and anything else that looks good. 

Directions:  Finely chop the garlic, then cut all other veggies into long thin strips (roughly 1/4 inch thick).  Heat 1-2 tablespoons of oil in a heavy skillet, throw the garlic and veggies in, and cook over medium-high heat, stirring frequently.  When veggies have started to soften, stir in 2-3 teaspoons of your favorite chili powder (more or less, to taste), or a mixture of 1/2 teaspoon each of ground cumin, ground coriander, red chili flakes, salt, and black pepper.  Stir till veggies are evenly coated in spices, taste and adjust seasonings, and continue to cook till veggies and reach your desired level of firmness for eating.  Spoon everything into warmed tortillas and add any or all of the optional additions:  cheese, beans, salsa, and sour cream.  For meat-eaters, you can startby sautéing strips of chicken, beef, lamb, etc., before the veggies, and stir all together before serving. 

Great Scape Veggie Tacos

 This made a fast, easy, fresh from the field dinner for us on Monday this week.  Minimal cooking, less than 20 minutes from idea to table, and uses several of this week’s subscription box ingredients.  We used flat crispy corn tortillas, but you could also use taco shells, or roll it into soft tortillas for burrito-style.  This recipe served two farmers. 

Ingredients

  • 1 bunch of garlic scapes (or 8-10 scapes) 
  • 1/2 bag of greens: lettuce mix, Asian Greens, or arugula 
  • 2-3 green onions 
  • 1 cup cabbage, finely chopped 
  • 1 can pinto beans 
  • 1/2 to 3/4 cup salsa
  • 1/2 to 3/4 cup plain yogurt
  • 1 cup grated cheese
  • 2-3 tablespoons of your favorite cooking oil
  • 2-4 taco shells or corn tortillas per person


Directions

Chop garlic scapes into small pieces (1/2 inch or less).

Heat oil in a heavy frying pan, sauté the garlic scapes for 2-3 minutes, then add the canned beans (drain off the liquid first) to the pan, and stir occasionally till heated.  

While scapes are cooking, chop the greens finely by piling up several handfuls and chopping vigorously with a large knife till they are small peices.  (note: we often don’t both to chop our baby greens at all, but a finer texture in this case helps you pile a lot more of them onto each taco shell….pack ‘em in! The two of us actually used a whole bag of greens for one meal). Chop green onion, including the greens, into small slivers, and grate or finely chop the cabbage.  Combine all of these in a bowl, and stir them together with the salsa and yogurt (you can replace part of the yogurt with sour cream to be really decadent).  

Layer grated cheese, scapes-and-beans, and the cabbage/ greens/ onions mixture onto the tortillas or taco shells, and serve.  Add more salsa, hot sauce, or additional toppings to taste.  Could of course be made non-veggie by cooking some ground or thinly sliced meats into the scape and beans mixture. 

Cilantro Lime Dressing

INGREDIENTS

  •   3/4 cup plain yogurt
  • 1/4 cup mayonnaise
  • juice of one fresh lime, or about 3-4Tablespoons bottled lime juice 
  • 1 small bunch cilantro
  • one stem and flower head of fresh chives 
  • 1/4 teaspoon black pepper (freshly ground if possible) 
  • 1/4 teaspoon salt

Chop cilantro and chive finely (use the whole stem, and the flower head), and stir it in with yogurt, mayonnaise, and lime juice in a bowl or a glass jar with agood lid.  Add salt and pepper and mix well (you may want to adjust the quantity up or down according to your taste).  Can be served immediately, but is even better if covered and refrigerated for at least an hour to let tastes blend.  

Makes a great salad with crisp greens, black beans, and a crumbled cheese, or as a burrito sauce. 

 A Varation:  Cilantro-chive and lime Dressing

  • 3/4 cup plain yogurt
  • 1/4 cup mayonnaise
  • juice of one fresh lime, or about 3-4Tablespoons bottled lime juice 
  • 1 small bunch cilantro
  • one stem and flower head of fresh chives 
  • 1/4 teaspoon black pepper (freshly ground if possible) 
  • 1/4 teaspoon salt

Chop cilantro and chive finely (use the whole stem, and the flower head), and stir it in with yogurt, mayonnaise, and lime juice in a bowl or a glass jar with agood lid.  Add salt and pepper and mix well (you may want to adjust the quantity up or down according to your taste).  Can be served immediately, but is even better if covered and refrigerated for at least an hour to let tastes blend.  


Massaged Kale Salad: Orange, Dill, Scapes and Balsamic Version

Ingredients

  • one bunch kale (any type works, curly varieties are especially nice) 
  • one small handful of fresh dill leaves and/or flower heads
  • 2-4 garlic scapes
  • 4-6 tablespoons orange juice
  • 3-4 tablespoons balsamic vinegar
  • 4-5 tablespoons olive oil or walnut oil
  • 1/4 teaspoon salt (or more, to taste) 
  • 1 can garbanzo beans, or about 2 cups home-cooked garbanzo beans 

Directions

Trim the center stems from kale leaves, and chop into roughly 1-inch squares (i.e., bite-sized pieces). 

Place the kale in a large bowl, and sprinkle with the 1/4 teaspoon salt, 3 tablespoons of balsamic vinegar, and 4 tablespoons of orange juice. 

Begin grabbing the kale by large handfuls in the bowl, and squeezing….keep grabbing, squeezing, and mixing back in until all the kale turns a brighter greens, and feels softer and less springy. You can also rub smaller handfuls between your fingers…this is the massaging, which breaks down a bit of the toughness of the kale leaves and will make them softer and easier to chew.  This may take several minutes, so be patient and just keep massaging.  

When kale is soft, set it aside and chop the dill and garlic scapes finely.  Toss them in with the kale, add the olive or walnut oil, and begin taste-testing. You may want to add more vinegar, more orange juice, or salt.  When you like the general combination, add the garbanzo beans, and stir.  

Serve immediately, or chill to serve later.  Goes well with a bed of brown rice, rolled in a whole-wheat tortilla, or stuffed into pocket breads. 

Roasted Tomatillo Salsa for Canning

Get your summer in the jars, before it's gone!  Noah and Mary moving fast at last year's salsa-canning party.  See below for a more reasonable home-scale canning recipe to make 6 pint jars of salsa.  

Get your summer in the jars, before it's gone!  Noah and Mary moving fast at last year's salsa-canning party.  See below for a more reasonable home-scale canning recipe to make 6 pint jars of salsa.  

September is a time for, to paraphrase that Greg Brown song, putting the taste of summer in a jar.  This time last year we were swimming in tomatoes, bring flat after flat to market, and cheering on customers' work freezing, canning, saucing, and salsa-ing vats of red summer goodness.  This year, it's a little bit different.  We are still crossing our fingers and covering our rows in hopes of a September ripening pulse for field tomatoes, but this may not be the year of red salsa.  But that's ok.  This year, our tomatillos are booming and we have officially declared this to be the winter of salsa verde.  

Funny story about salsa verde...I grew up in rural Oregon before the region had the benefit of much Hispanic presence and culture.  Think Farm Bureau picnics stocked with 15 kinds of potato salad and corn on the cob; maybe someone got exotic and made the taco salad that included crumbled tortilla chips and ground beef cooked with chili powder over iceberg lettuce. So, I felt pretty worldly when my 7-th grade Spanish skills accurately analyzed "salsa verde" on the menu of the one Mexican restaurant in the area to mean "green salsa."  But for years, I assumed it was made with green (as in un-ripe) tomatoes.  I might even have tried making it that way once, with predictably not-so-good results.  

I don't know exactly when I first learned that the key to good salsa verde was good tomatillos, or in which garden I first grew these sprawling, hardy, prolific little plants, but I do know that now I am hooked.  Tomatillos are a relative of tomatoes, but grow to a smaller size, meaning among the things that they tend to ripen sooner, and will generally just keep popping fruits through the first few frosts.  They offer a sweet-tart taste and texture that is so much better than un-ripe tomatoes, and I am always grateful for how tough they can be through fluctuating temperatures, watering, and often a good bit of neglect.  

We have been selling small salsa packs at market with all the ingredients needed for a quick and easy fresh salsa verde to make and eat in small batches.  As we head into fall, with cases of tomatillos piling up, it was clearly time to find a good recipe for folks looking to stock up and can (and we need to do some of that ourselves!).  To keep yourself well supplied with local salsa through the winter, we recommend this simple roasted-tomatillo recipe published by Ball (the canning jar company).  If you are freezing the salsa, you can play around with adding or substituting ingredients and altering the recipe with abandon.  If canning, please stick with the recommended quantities, as this will give proper levels of acidity for safe preservation.  

Roasted Salsa Verde Canning Recipe

makes about 6 pint jars of salsa

8 lbs tomatillos, husks removed

4 medium-sized white onions, each cut into 8 wedges

4 jalapeno, serrano, or Anaheim chilies

12 garlic cloves, peeled

1 cup lime juice

1/2 cup coarsely chopped fresh cilantro (optional)

4 tsp salt

2 tsp black pepper

  1. Preheat oven to 450 F.  Arrange tomatillos, stem side down, on a large rimmed baking sheet or casserole pans.  Place onions, peppers, and garlic on baking sheet or dish.  Bake at 425 for 15 minutes or until garlic is softened.  Remove garlic from baking sheet.  Bake onion and tomatillo mixture 15 more minutes or until onion is tender and tomatillos and peppers are slightly charred.  Remove from oven and cool slightly.  When peppers are cool enough to handle, remove stems and seeds (can include seeds by putting them back into he mixture for a hotter salsa). 
  2. Process roasted vegetables and garlic, in batchs, in a food processor until smooth.  Transfer to a large stainless steel or enameled saucepan.  Stir in lime juice and remaining ingredients.  Bring to a simmer.  Remove from heat. 
  3. Ladle hot salsa into a hot har, leaving 1/2-inch headspace.  Remove air bubbles.  Wipe jar rim.  Center lid on jar.  Apply band, and adjust to fingertip-tight.  Place jar in boiling-water canner.  Rep[eat until all jars are filled.  
  4. Process jars 20 minutes (25 minutes for our altitude, if you are making this here in Hamilton).  Turn off heat; remove lid, and let jars stand 5 minutes.  Remove jars from water bath and allow to cool.  


Enjoy through the winter as a salsa or an enchilada sauce!  


Recipe from:  The Best Ball Home Canning & Preserving Recipes, Spring 2016 edition

Salad For Dinner: Beyond Lettuce.

One of my favorite moments with one of our the members of our Community Supported Agriculture programwas when, last summer, Mo told us in a tone of surprise “I realized this summer that I love salads, I just don’t like lettuce!”  She’d spent the summer loving the “spicy mix” and other Asian greens, Boc Choi, Napa Cabbage, and all the other fresh leaves that go way beyond lettuce.  I’ve been remembering that discovery for several reasons this week.  

For one, we are still hoping to enroll quite a few more members into our summer CSA program, which starts this Tuesday, so I’ve been considering how to explain the program and the benefits you can get from becoming a part of the farm family in this way.  Exposure to new types of leaves and vegetables is actually one of the best features of a farm membership.  We all get stuck in ruts and habits, but when you are presented with a bag of leaves of a different type than usually fill your salad bowl, or a head of fennel or boc choi, you are likely to eat it simply because it is in your kitchen—and more often than not, we hear from our members, you are likely to just fall in love!  Whether it’s discovering salads other than lettuce, learning to cook something you’d never buy at the store, or just having a little more impetus to actually get your 5+ servings of veggies a day, letting us pack a bag of vegetables for you each week can open up some new habits and experiences, and we think that’s great.  

I’ve also been thinking of salads beyond lettuce for a slightly more embarrassing reason—a major mis-calculation on my part meant we over-estimated our lettuce yield this week, and in selling 57 pounds of lettuce mix to the Western Montana Grower’s Co-op yesterday, we fear we may run short at market.  With hot weather on the way, salads for dinner are going to sound great, and we are short on lettuce?!  Nuts.  But then of course I remembered, there’s more to salads than lettuce!  And we have plenty of other greens coming in.  And so, for this week, a new dressing recipe (thought up in the washing station with hands full of greens, and tested out Thursday night), and a couple of simple ideas for non-lettuce salads.  With a sudden change of weather and forecasts of highs in the 90’s, now is a perfect time to load up on cool crisp greens, keep a few types of pre-cooked protein in the fridge (hard boiled eggs, tofu, chicken, etc.), and build up a solid dinner salad.  

Boc Choi cut in the field, ready to join you at the dinner table.  As a raw green, it's high water content and crunch make for a great cooling salad, perfect for the hot weekend coming up.  

This week’s recommended, non-lettuce salad #1:  

Mild and crisp: Boc Choi and Radish Salad with Sesame-Miso Dressing

Cut the bottom end off of a head of boc choi, and rinse all stems and leaves in cold water (we dunk the heads in clean cold water, but sometimes soil hides down at the base of the stems, so a second rinse before cooking is good).  Chop all stems and leaves finely.  Combine in a large salad bowl with one bunch of radishes, grated or thinly sliced.  Snow peas or snap peas make a nice addition, too. Sliced hard-boiled egg or baked tofu are great mixed in to make this more of a meal.  Serve with dressing recipe below, as a salad, or rolled into a tortilla for an easy lunch wrap.  

Miso-sesame dressing.   A mild but savory dressing, we think it does go well with Boc choi, radishes, and/or Asian greens.  

  • 2 tablespoons olive oil
  • 2 tablespoons sesame oil
  • 2 tablespoons apple cider vinegar
  • 2 tablespoons rice vinegar
  • 2 tablespoons minced onion
  • 2 tablespoons Miso paste
  • 1 tablespoon lemon juice
  • 2 teaspoons sugar

Blend all ingredients until smooth, store in an airtight jar in the fridge. 

This week’s recommended, non-lettuce salad #2:  

Strong, Sweet, and Spicy:  Asian Greens and Ginger Dressing

Top baby Asian Greens (the greens mix formerly known as “spicy mix”) with snow peas, scallions, and cubes of chilled grilled chicken.  Dress with the Ginger-soy dressing from this recipe.  Tossed with chilled cooked noodles or crusty bread, this makes a good hot-weather salad dinner. 

Hot And Brothy Asian Expat Soup

When Noah and I began our courtship through long emailed letters he was still working in Asia and Africa, with a home base between projects in Kuala Lumpur, Malaysia. From more than one country, he wrote fondly of the comfort of noodles.  The simplicity and warmth of a very basic simple soup, just broth, sauce, greens, and noodles.  If I were to dig back through our history, I am sure I could find the slightly giddy Skype text chat wherewe used “noodle” as an affectionate mutual moniker.

After he moved back to the US, one clear drawback to our small-town Pacific Northwest life was a noticeable deficiency of street stalls where a weary conservation worker/ photographer/ writer/ farmer could walk out and pick up a restorative hot steaming bowl of noodles and vegetables in broth.  The solution, as has become the case with so many farming needs from soup to chicken pluckers, was simply to learn to make it ourselves.  

The following recipe is a simple base that can be improvised upon endlessly, works with fresh or frozen greens, and seems especially appealing in the cold rainy moments of spring when the field is full of leaves that have to be harvested.  After a particularly good batch of broth came out of our last chicken butchering (big feet on those roosters = thick and savory broth), we have used this soup to warm up and get back to the field many days these past few weeks. Whatever your tasks at hand this week, we hope it will bring come comfort to your table, too.  

Ingredients:

  • 2 quarts of the best broth or soup stock you can make or get, home-made if possible.  Bonus points for a broth made with chicken feet for extra gelatinous goodness.  If your broth is lacking in oomph, consider adding a tablespoon or two of Miso paste to help.  
  • 6-12 cloves garlic
  • 2 dried “red rocket” chilies, finely chopped or ground in a spice mill or coffee grinder.  can substitute 1-2 tsp red chili flakes
  • 1 head Boc Choi
  • 1 bag (1/2 lb) cooking greens or Spicy Mix/ Asian Greens mix
  • 1 medium onion
  • soy sauce, salt and pepper, and hot sauce, to taste
  • 4-6 oz of noodles (we like Soba noodles, or a rice noodle, but have been known to use whatever was in the pantry, in a pinch..including broken up lasagna noodles on one desperately cold and rainy harvest day this spring)  

Directions: 

In a medium-large pot, slowly bring the broth to a low simmer.  Add noodles and allow to simmer while you cook other ingredients (approximately 8-10 minutes).  Check periodically, and remove from heat when noodles reach almost-done stage.  

While noodles are simmering in the broth: 

Coursely chop onion, garlic, and boc choi head (stems and greens).  

Sautee the onion and garlic in oil (sesame or coconut oil are especially good with this soup), until they start to soften. 

Add the boc choi and red chili flakes, sauté for about 2 more minutes, until boc leaves turn brighter green and begin to soften. 

At the very end of cooking, add the bag of cooking mix or Asian greens and stir in the pan until they just start to wilt.  Add the contents of the sauté pan to the broth and noodle pot, and simmer gently for 2-3 minutes to blend flavors, then dish into bowls and serve hot.  

Garnish if desired, with soy sauce, drops of sesame oil, rice vinegar, chopped green onions, peanuts, or cilantro, more red chili flakes, sri racha sauce, grated radishes…for example.  

Other options:  in season, add thinly sliced carrots, sweet peppers, cabbage, or summer squash to the veggie combo. You can skip the noodles entirely and pack it with additional greens, for a grain free version.  You can vary the broth by adding a few spoonfuls of peanut butter and a dash of rice vinegar or cider vinegar, and/ or a spoonful minced ginger.  


Spring Greens and Quinoa Salad

This salad started as a Sunday volunteer lunch-feed, but the enormous bowl continued to support us for several more meals in slightly altered variations.  Even if your schedule is busy with things other than planting, weedind, and wrangling animals, you may still appreciate the two meals from one start, and a great way to use a pile of fresh spring greens.  

First-round:  Chilled Quinoa and Greens Salad

Several hours before the meal, cook 2 cups quinoa (or substitute your favorite noodles for a pasta salad). After cooking, cool the cooked grain or noodles in the fridge.  

While quinoa cools, finely chop one half-pound bag of Arugula, and one half-pound bag of cooking mix or spicy greens.  Grate 1 bunch radishes and set aside.  

Mix the Dressing:  in a wide-mouth pint jar, or a blender, combine: 4 tablespoons olive oil, 4 tablespoons balsamic vinegar, 1 tablspoon water, 1 teaspoon blackberry jam, and 3 tablespoons minced chives.  Blend till smooth with an immersion blender or standard blender (add salt and black pepper to taste).  

When quionoa is cool, toss together with chopped greens and dressing.  Top with grated radishes, and serve.  

Second Round:  Sausage and Salad Tacos  

To authentically re-create this working lunch, you should first, one to two years before planning this meal, befriend a nice farming or homesteading family. This will bring you many benefits, the most relevant to this recipe being that you may happen to have on hand some delicious home-grown sausage that they happened to drop off on their last visit.  If you are vegetarian or vegan, you could substitute some extra onion, garlic, and/or mushrooms to make your tacos instead, but I still recommend making the friends.  

Cook sausage (4-6 oz per person) in heavy pan till browned. Add 1/4 cup of finely chopped onions for each person, and a pinch of crushed red chilies.  Stir in 1-2 cups of the leftover quinoa per person, and stir till heated through and the sausage bits are evenly distributed.  

Scoop into warmed corn tortillas, and serve topped with cheese and salsa or additional red chili flakes.  


Ginger Dressing

This ginger dressing is one of my favorites, perfect for these salad mixes of baby "Asian Greens" (as we have recently learned to call our "spicy mix" when delivering the the Western Montana Grower's Co-op). I seem to like it best in early spring, and turn to other fruity vinaigrettes and creamy dressings mid-summer, so this is the perfect season to share this one, from one of my favorite seasonal cookbooks, Simply In Season, by Mary Beth Lind and Cathleen Hockman-Wert: 

Ginger dressing
6 Tbsp olive oil
3 Tbsp balsamic vinegar
2 Tbsp brown sugar
2 Tbsp soy sauce
1 tsp paprika
1 tsp mustard, Dijon or stoneground
2-3 cloves minced garlic
2-3 inches ginger root (peeled and minced) 
freshly ground black pepper to taste.  

Combine in jar with tight-fitting lid, and shake well.  Or, mix all ingredients with blender--an immersion blender in a wide-mouth mason jar works beautifully.  This dressing also works well as a stir-fry sauce for a variety of vegetables or cooked greens of all sorts.